This is an illustrated recount of the upgrade of my rather big laptop, with full commentary and explanations of my choices and the reasons behind them.
The laptop in question is the really great MSI GT640 which has been faithfully serving me for the past three years. However, times are changing and I had been getting increasingly aware that my usage patterns, as bad as they are, were pushing the limits of this computer.
 |
| The target of the upgrade, an MSI GT640. Awesome machine! |
The main weak point of the GT was its memory, or shortage thereof. The computer came equipped with 4GB of RAM, of which only 3GB were usable due to the 32-bit version of Windows 7 that came pre-installed with it. Back when I first got it, that wasn't much of a problem, but my annoying habit of having Firefox run with a couple of hundred tabs open simultaneously, quickly exhausted the supply of free bytes and forced Windows to start extensively using the disk-based pagefile, leading in horrible delays (and consequent annoyance).
 |
| The Elixir pair of 4GB RAM modules |
Predictably, the first item of business in need of an upgrade was the RAM. The street price for laptop RAM modules isn't bad at all, however I made a conscious choice and went for second-hand and eBay. These days, most gaming laptops come equipped with 8GB of RAM and a lot of gamers upgrade to 16GB almost immediately; therefore, there are a lot of practically unused RAM modules for sale out there. One of these sets found its way into my hands for a reasonable £35.
However, the simple addition of RAM would only mean that the amount of RAM that the 32-bit operating system cannot use would increase from 1 to 5 gigabytes. The operating system would have to be changed to a 64-bit version, so that all 8GB could be used.
The bad thing is, you can't just upgrade an existing 32-bit installation of Windows to 64-bit; it has to be a clean installation. The good thing is, though, you don't need to buy a new version of Windows; the same licence can be used for either 32- or 64-bit versions.
Since I was considering reinstalling Windows and formatting hard disks, I had been thinking of getting an SSD (solid-state drive using flash memory chips instead of rotating discs) for quite some time. They've been around for long enough, gone through their teething issues so now they're very fast and at the same time, cheap enough to replace the system drive of a computer without having to sell your first-born to get one.
 |
| The new SSD: very fast and very stylish! |
There was a model that had caught my eye for being very fast, the new-ish Samsung 840 Pro; the 128GB model being just perfect for my needs as a system drive. Obviously, I could find something a bit cheaper and not lose a lot in speed, but I knew that in the end I'd just be regretting not spending that little bit more. In for a penny, in for a pound. After a brief search, I managed to get a brand-new sealed one for an amazingly low £85!
The logical course of action would be to remove the old mechanical (i.e. spinning discs) 500GB Seagate drive and replace it with the new SSD, but having free space for movies and photos is hard to give up. Thinking about it and regretting that the MSI engineers didn't save some space for a second drive, I realised that they did save space for a DVD recorder, something that I had used no more than 3 times in those 3 years that I've had the computer. The DVD drive is SATA, so I started thinking if it'd be using the same connector as a hard drive. The bad news is, they don't. Optical SATA drives have a slightly smaller connector. The good news is, there are adapters!
 | |
| The no-name adaptor comes with a screw- driver and an extra faceplate for itself or the optical drive it replaces |
The adapter is a case, with the exact same shape and dimensions as an optical drive for laptops. The main difference is that this one has an empty space for a 2.5-inch hard disk drive and the appropriate connectors: inside, a standard SATA connector, outside, a slimline SATA connector. Strategically positioned screws make sure the drive stays put, while the designers have made sure to include all the mounting holes, threads and notches typically found on optical drives, so that the adapter can replace (almost) any optical drive without issues.
Thankfully, the manufacturers have settled for more or less standard positions and gauges for brackets, clips, screws and sockets, so there is little that can go wrong there.
Most devices are interchangeable, with only a fixing bracket or two needing to be relocated.
Again, eBay is our friend and I ordered one of those for a mere £5 and that's including shipping! I had some reservations concerning the build quality (especially that of the electronics), but since the adapter electronics are entirely passive (i.e. only "wires" and sockets and no components other than, maybe, a couple of resistors or capacitors), I concluded that it would be pointless to spend more money on something that would in all probability have had come from the same factory. After a couple of weeks' wait due to China being so far away and having some national holiday then, everything was all set for the big day of the upgrade!
Act one: the hard drives
The big question that troubled me while I was waiting for China post to deliver the adapter was this: do I put the SSD in the adapter, or do I put it in the disc drive bay and move the mechanical drive in the adapter? After oscillating between the two options a number of times, I decided to wait until the adapter arrived. In retrospect, that was a wise choice -- not that I could have done anything without the adapter anyway -- since inspecting the adapter was detrimental. I came to realise some things which all pointed towards one option:
- the mechanical hard drive is producing vibrations and is susceptible to vibrations and interference
- the solid-state drive is not producing movement of any sort, nor is it affected by it
- the construction of the adapter cage is not rigid enough to dampen any vibrations
- the laptop's own hard drive bay is designed to withstand and dampen both external and internal vibrations
Therefore, the mechanics were pointing towards keeping the mechanical drive where it was and install the SSD in the adapter. However, there's another side:
- the mechanical drive requires a lot more power than the SSD
- the Samsung 840 SSD is extremely low in power consumption
- the slimline SATA connectors of the optical drive bay and adapter are by design rated for 33% less power than the full SATA connector on the 5V line
The verdict is easy to reach: the mechanical drive stays put, where it will be safe from its own but also any external vibrations and will be properly powered by the full SATA connector. As for the SSD, its inherent indifference to vibration and movement makes its positioning irrelevant, while its very low power needs will be well accommodated by the adapter's slimline SATA connector.
Case rested.

The first step is to insert the Samsung SSD into the adapter tray and secure it with the enclosed screws. The procedure is rather straightforward, even though the screws that were provided with the adapter were already screwed into position. The left side's screws are actually hidden inside the case, so I had to locate them blindly and taking a leap of faith.
However, I didn't have to worry about screwing the disk tight in place, since we're talking about an SSD and as such, it is both oblivious and incapable of any movement or vibration, as it does not utilise any moving parts at all. All that is needed is to make sure that it won't move backwards and out of the SATA socket by some jolt or sudden movement and for that, even one screw would be enough.

This particular adapter comes with a mystical switch (see close-up photo), the function or indeed its mere presence was mentioned nowhere. After some digging and reverse-engineering, I found that it has to do with a pin of the SATA connector, which some laptop manufacturers use to detect the presence (or functionality) of the attached device.
The right position is the "generic drive" setting for most laptops -- I believe Lenovo and HP differ, but don't take my word for it.

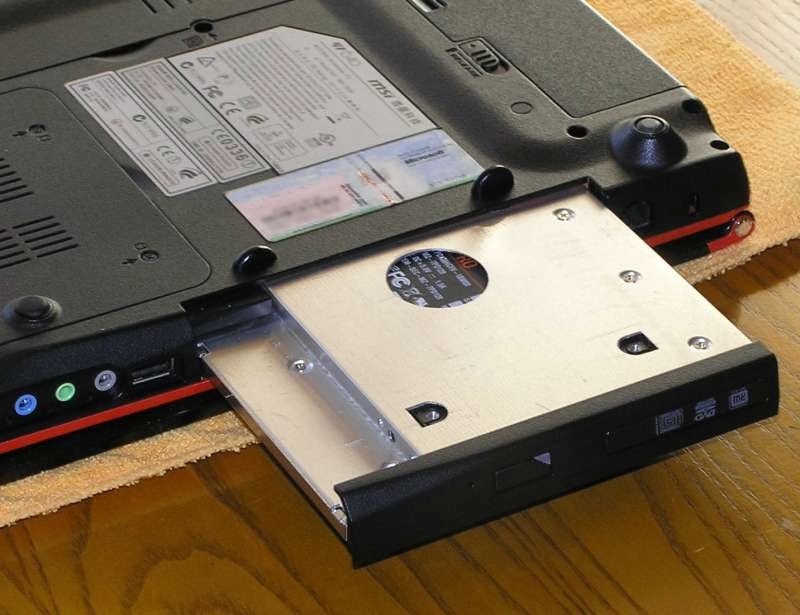
Removing the DVD drive is a matter of unscrewing one single screw and sliding the drive out of its slot.
The drive slides in its place rather tightly and there's very little space for wobble anyway, so one screw is enough to make sure it doesn't get pulled out by accident, when ejecting. Obviously, the hard disk adapter caddy won't suffer from that problem since there's nothing to eject.
Note that in the photo, I've ejected the DVD drive, since I needed to remove the custom faceplate of the drive from the optical drive and relocate it to the adapter. The reason being rather obvious: the faceplate is curved and follows the contours of the laptop's underside, so it needs to be transferred to the hard disk adapter, otherwise there would be a gap left.

After removing the optical drive from its bay, the next step was to remove the fixing bracket from it and attach it onto the disk adapter. As I mentioned before, the designers made sure to include screw holes and threads in all the right places, so relocating the bracket was a matter of un- and re-doing two screws.
In the photo, the two fixing holes are visible in both the adapter (obviously top) and the optical drive (bottom); the bracket itself accompanied by its two fixing screws rests comfortably to the right. This bracket is responsible for holding the entire DVD chassis in place and connected, secured by that one screw that I removed earlier.
Notice how smaller the slimline SATA connector is, compared to the internal full-size connector (seen in previous photos).

Final step before show time, the exchange of the faceplates. The faceplate is attached onto the optical drive by two main clips that need to be undone. One is horizontal and on the right side, the other is vertical and on the left side. The optical drive needs to be ejected in order to safely undo the clips without breaking them and, just because I hadn't thought of that before switching the laptop off, the DVD got the infamous "bent paperclip treatment" (also known as ejecting the drive by inserting a bent paper clip into the manual ejection hole). The re-attachment of the faceplates is really easy and, as I mentioned earlier, the adapter has the necessary holes and notches in the right places, so the faceplates are interchangeable. I also fixed the spare generic faceplate that came with the adapter onto the now defunct DVD drive; being neat is one reason, keeping the spare plate safe from being misplaced or lost is another.

The end result is a very compact and neat module! Ready to be inserted in what once was the "optical drive bay" and replace the ageing Seagate as the computer's main system drive.
Samsung has really gone to town with the design of the 840 series. It almost makes me feel sad that the hard drives are not visible from the outside, as this one is a piece of art.
Going back in. The adapter slid effortlessly but snugly into the bay and was secured by the single screw that was removed at the beginning of the operation.
The adapter-SSD assemblage goes in up-side down, but if you take into account that the laptop is already up-side down, in the end the SSD will end up right-side up.

The fit is excellent. Even though the insignia on the faceplate indicate a DVD recorder, the truth lies hidden within: a lightning-fast SSD ready to receive a fresh installation of Windows 7 64-bit.
During the first power-up, though, I had a pleasant surprise: the adapter comes equipped with an appropriately positioned double-colour activity LED, which lines up with the optical drive's activity LED 'window' on the faceplate and looks like it really belongs there! When inactive, the LED shines blue, matching the blue LEDs on the laptop's front panel and, when accessing the drive, it changes colour to a pale red!

Before installing Windows, though, there was one last thing that needed being done: going into the computer's BIOS and setting the new Samsung SSD drive as the one to boot from, instead of the old Seagate. Of course, the whole procedure takes less than 30 seconds from start to finish. All you have to do is go through the available options looking for something like "Boot sequence" or "Boot drive". The available options should now include the new SSD, as it did in my case, so the option went from Seagate to Samsung, then save and exit BIOS.
Time to install Windows... obviously from a USB stick, since now there's no drive to read the DVD!
Act two: the memory
While waiting for the hard disk adapter to arrive, the memory modules showed up so I got to install them anyway. I figured, they may not be utilised to 100% but the time they spend working will be a test to verify their full functionality. Of course, a couple of hours with MemTest would help as well, but you never know.
I have to point out, though, that while I strongly discourage buying second-hand computer parts that have perishable parts (monitors) or moving parts (hard disks, optical drives), parts that only have solid-state components usually work for decades. While the former degrade with time, so you could end up buying something that works for a few weeks and then dies, the latter (electronics) don't get affected. I am personally quite confident buying RAM modules, processors, graphics cards, motherboards or any other computer part second-hand.
Replacing the RAM modules is actually very easy, so let's do it!

First step is to turn the laptop upside down and locate the hatch that covers the memory sockets. In the case of the MSI, it was pretty much straightforward, since this laptop only has two covers, one small-ish for the hard disk bay and one very big, which covers... pretty much the rest. Two screws later, the cover is gone and the entire hardware of the laptop is visible.
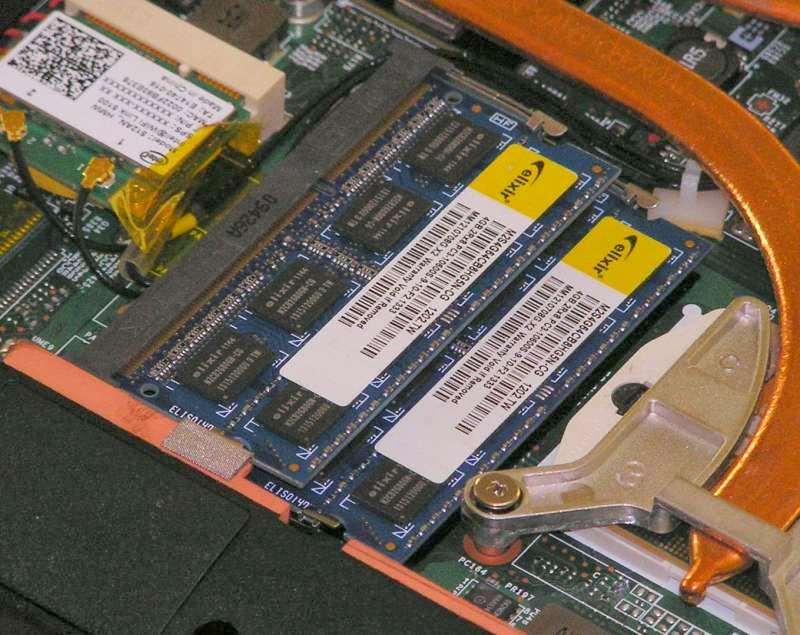
From the... satellite view, apart from the memory sockets (lowerr middle), there's the graphics card -- which is very conveniently not on-board but on an MXM card and easily upgradeable -- on top-right, the CPU bottom right and the tiny PCI-Express cards for WiFi, Bluetooth and... a couple of empty ones for future expansion! I love you, MSI engineers!

Closing in on the RAM, the two modules are in SO-DIMM form, which is standard for laptops, so there's no need for adapters or other tricks here. Removing the modules only involves gently pushing two metallic clips outwards, and the module pops up!
The old modules are 2GB each, Hynix DDR3 8500, working at 533MHz (1066MT/s). Those were pretty standard for 2010.
Installing the new DIMMs is even easier than removing them; all that's needed is to insert the module in the slot at an angle and push it down until both clips latch in place (with a very reassuring 'click').
The new modules I got are Elixir DDR3 10600, working at 667MHz (1333MT/s) and they're 4GB each.
So, apart from the increase in capacity, I also got a nice 20% speed bump in RAM frequency!
It's always welcome when, along with the planned upgrade, you get collateral benefits.
That's all there is to it. Now, all that was left was just putting the cover back in place, screwing the two screws back in and... well... turning the computer right side up!
The memory subsystem will take care of the rest. There's no need to go into the BIOS or do anything. The computer will detect and use all available memory straight up.
Conclusions and afterthoughts
I have to admit, I am rather pleased with the end result. The system is markedly faster, the boot time has been shortened and the operating system feels snappier and more responsive altogether, even when I've got multiple applications running and taking up large amounts of memory. But let's break things down.
- The extra memory in itself has helped tremendously, since there's plenty of it to go around and the system rarely has to make extensive use of the pagefile.
- The solid-state drive is a lot faster than the old mechanical drive, in both raw transfer speed and in seek time, which has gone down by a factor of 100! The system's boot time but also launching applications is a lot faster and all the system delays have pretty much disappeared.
- The 64-bit version of Windows 7, newly installed, is helping as well, making use of all 8GB of RAM, compared to the 3GB that the 32-bit version could make use of. Moreover, the fresh installation and controlling which drivers and which applications get installed, means there's no unnecessary programmes and services running at any time, something which is unavoidable on pre-installed laptops.
Whilst doing all that, I started wondering about the possibility of upgrading the graphics card as well. The reason is rather simple, really: reducing power consumption. The GT640 comes with an nVidia GTS 250M card, which is rather high-power and, for its time, relatively high-performance. Its thermal power output, as announced, is 28 Watts. However, I never play games, so the maximum 3D rendering prowess of the GTS is hugely irrelevant to me, so I could very well use a different graphics card with a newer graphics processor, which could decrease the power consumption significantly. After some searching, I decided that the best option would be one of the smallest models of the AMD Radeon Mobile family, either the 7430M or 7450M, or the newer 8550M/8630M cards; all of these cards have higher performance than the old GTS and at the same time, their power rating is a staggeringly low 7 Watts! Of course, I could also get one of the older 6330M, 6350M or 6370M which also have a quite low power rating, but obviously I'd rather go with something more modern.
Unfortunately, MXM cards are not for sale in retail stores, so I'd have to get a second-hand one from eBay. The problem here is that those cards are pulled from broken laptops and sold as spare parts, so their prices are outrageous. However, stay tuned as something might come up.
The other thing that could be upgraded is, of course, the main processor. However, there are downsides. Laptops are designed with a cooling system specific to the CPU that comes installed. Faster CPUs produce more heat and the cooling system could have problems dissipating the extra heat, something which could mean that the fan would be working more and at higher speed (resulting in extra noise) at best, or the entire system overheating on a regular basis, which would affect the longevity of the components or even cause some component to fail, at worst.
In any case, Intel's practice of changing the CPU sockets with every new generation is limiting the choices available for upgrading the processor. Also, it's same situation as with the graphics cards: mobile CPUs are not available for sale in retail, so it's eBay, spare parts and overpricing all over again.
However, after the RAM upgrade and the new SSD, the MSI laptop has got a new lease of life. It's fast enough for the majority of my needs and capable of remaining fast even at considerable load.
Would I recommend those upgrades to anyone else?
I would, not only recommend, but strongly encourage you to give your trusty laptop (or ageing desktop) some TLC and make your life easier. Instead of suffering or, even worse, buying a new computer just because you think that your old one can't cope any more, make the smart move and upgrade the "weakest links" of your system.
You will see that there's still plenty of life left in your old rust-bucket after all!
No comments:
Post a Comment